Bhoopathi

"Be Somebody Nobody Thought You could Be"

Thursday, September 29

MS CRM – How to Schedule Recurring Workflows in MS CRM 2011

Scheduling recurring workflows in CRM:

Below the instructions taken from the excellent blog post, he does attach some warnings and this is true because you have to be very careful about clogging up the ASYNC service because if you have ever experienced it going down you will know how important it is to CRM, if it shuts down or even slows down it’s a big problem.

WARNINGS:
  • Every time you create a recurring workflow, you should carefully consider what resource consumption implications it will have. Recurring operations tend to utilize a large amount of resources which can cause lagging to the CRM Asynchronous processing service.
  • You must select a primary entity for your workflow which will never be deleted, otherwise the entire recurring workflow will be cancelled. For example, you can set the primary entity of your workflow to be systemuser and trigger it the first time regarding your own system user.
  • There is a loop detection mechanism in CRM which would cancel processes/plugins that create infinite loops as the one above. The maximum depth for a recurrence/loop is 8; however, the depth is reset after 10 minutes of inactivity. Therefore, the workflow above should work fine because it has 1 month of inactivity so each time it executes the depth will be reset and it will never be cancelled by the loop detection mechanism.
1.  Define triggers:
Define the workflow as On-Demand and Child workflow (not automatic triggers)
2.  Define process:
Define the body of the workflow to represent the set of actions that must occur every month:
3.  Add the Wait:
Now you need a way to tell the workflow engine to repeat the process every month. To do so, I will first insert a wait step that will tell the workflow engine to wait for 1 month:
After the step, I need a way to “restart” the workflow. Since there are no while/for loops in the workflow designer, we must find another solution. I will simply create a recurrence pattern by having an “Execute child workflow” step which executes itself. Because the workflow is defined as a child workflow, it will call itself every month. After I activate the workflow it looks like this:
4.  Trigger the workflow once
The first time that the workflow executes, it must be triggered manually, after that it will schedule itself monthly from the time that it was executed manually. Since it is defined as an on-demand workflow, you can simply navigate to your primary entity and trigger the workflow manually.
5.  Verify
Once your workflow has been triggered for the first time, it should appear in the system jobs grid, waiting for the next month to resume execution:
Note that “month” is not the same as 30 days, it actually uses the calendar month definition, since CRM workflow uses the .NET DateTime class. Therefore, if it was first triggered the 1st of the month, it will always trigger the 1st of the month regardless of the number of days in a month.

MS CRM :: Creating Dialogs

Creating MS Dynamics CRM - Dialogs :

Dialogs are a feature introduced in Dynamics CRM 2011. They provide a great way to standardize processes and ensure specific information is routinely captured.
Here is an example:
A sales lead’s contact information is out of date. We will create a simple dialog that will prompt a CRM user to update the lead’s Business Phone, Mobile Phone, Email and Preferred Contact Method. The CRM database will be a standard install with only the out-of-the box features displayed.
Navigation
1. From the navigation menu, select Microsoft Dynamics CRM > Settings > Processes.
Creating dialogs in Dynamics CRM 2013
2. Once the default My Processes view is displayed, click the New button from the menu.
Creating dialogs in Dynamics CRM 2013
Creating the Dialog
  1. Provide a unique Process Name for the new dialog.
  2. Select Lead as the Entity.
  3. Select Dialog as the Category.
  4. Leave New Blank Process as the selected Type.
  5. Click OK.
Creating dialogs in Dynamics CRM 2013
The Create Process window closes and a new Information window appears with the General tab selected.
Creating dialogs in Dynamics CRM 2013
[NOTE: In this example, we will leave the As an on-demand process box checked. It is possible to build complex dialogs that are initiated programmatically. It is also possible to relate dialogs to each other, but both of these functions are outside the scope of this tutorial.]
Creating the Prompts
Dialogs operate as a series of pages, much like a common setup wizard. Each page should contain specific functions that flow to subsequent pages.
1. Click Add Step.
2. Select Page.
Creating dialogs in Dynamics CRM 2013
3. Choose a unique name for the page (Page 1).
4. Select the row beneath the Page description and click Add Step.
5. Choose Prompt and Response from the drop down list.
6. In the new available field, provide a description for the Step.
7. Click Set Properties.
Creating dialogs in Dynamics CRM 2013
8. Provide the Prompt Text in the text area. This will be the text displayed to the CRM user.
 Creating dialogs in Dynamics CRM 2013
9. Provide a Tip Text in the text area. Tip Text provides additional information for the selected prompt.
Prompts 9
10. In the Response Details section, choose Single Line as the Response Type for the prompt. The Response Type correlates to the type of information being captured. A phone number is a single line of text, so Single Line is the appropriate choice.
Prompts 10
11. Choose Text as the Data Type for the prompt. While business phone is a number, it is not considered a numeric value (you wouldn’t perform arithmetic on it), so it is stored as text.
Prompts 11
12. Leave Log Response checked as Yes.
13. Leave Default Value blank.
Prompts 13
14. Click Save and Close.
Prompts 14
15. Repeat steps 11-21 for Mobile Phone and Email.
Prompts 15
Now that we’ve captured some data, let’s create a prompt for the lead’s preferences.
16. Create a new preferences prompt with Prompt Text.
17. In the Response Details choose Option Set from the Response Type list
18. In Data Type select Integer.
19. Leave Log Response checked as Yes.
20. Leave Default Value blank.
Creating Prompt Responses
Now we need to set up the preference options. Since this is an actual field within CRM the response options will need to relate to the CRM options. Here are the available CRM preference fields:
Responses intro
In our example, we do not want the CRM user to choose the Any option, so we will omit that as an option. It is important to remember that the values in the prompt must match the CRM values.
  1. Click on the prompt button icon to add a new response value.
  2. In the Value field, enter 2 as the value.
  3. Enter Email as the Label value.
Responses 3
4. Repeat steps 28-30 for Phone, Fax and Mail incrementing the value by 1 each time.
Responses 4
5. Click Save and Close.
Responses 5
Update the Lead Record
At this point, we have created the prompts for the CRM user. Next we need to create a step to update the lead record.
  1.  Click on the Page and select Add Step
  2. Choose Update Record.
  3. Provide a description for the update step.
  4. Click Set Properties.
Prompts 1
Prompts 1-2
The Update Lead page is displayed, showing the lead entity properties. Here we will map the CRM user responses to the lead record fields.
5. Click in the Business Phone field.
6. In the Form Assistant select Look For > What is your Business Phone Number.
7. Click Add.
8. Click OK.
Lead Record 8
Lead Record 8-2
9. Repeat steps 37-40 for Mobile and Email.
Lead Record 9
10. Under Contact Method click on Preferences.
11. In the Form Assistant select Look For > How would you prefer us to contact you.
Lead Record 11
12. Click Add.
13. Click OK.
Lead Record 13
14. Click Save and Close.
Lead Record 14
Activate and Run Dialog
Once a dialog is finished, it will need to be activated. A dialog cannot be run until it has been active.
  1. From the navigation menu at the top choose activate button and confirm the activation process at the prompt.
  2. Navigate to the Leads entity.
  3. Click on the ellipsis.
  4. Choose Start Dialog.
Activate 4
5. Select the dialog that was just created.
6. Click Add.
Activate 6
Activate 7
That’s it! Creating dialogs in Dynamics CRM 2013 is simple if you follow these steps. If you thought this was cool, try your hand at creating workflows.

Friday, September 23

MS CRM :: Calling Actions from Plugin in CRM 2013

Calling Actions from Plugin in CRM 2013

One of the most powerful features introduced in CRM 2013 is Actions. It strongly supports the concept of XRM platform. Actions are the Custom messages which can be created for any entity or globally to perform business operations like create/update/Assign etc. (more than what a Workflow can do). Looking first time we get a feeling that it is very similar to Workflow but hold on it’s very different from WF’s or Plugins.
Below are the key points which make it different:
  1. Can be associated with single entity or globally.
  2. Actions support Arguments – Input and Output Arguments.
  3. Can be only called through web service calls – either JavaScript/Plugins/Web through API calls.
  4. Supports Rollback and executes in real time.
  5. Always runs under the context of the calling user.
Arguments
Arguments are the parameters or the variables which can be used while creating the action. There are two kinds of arguments
 Input Arguments:
These are the parameters which need to be passed during action call. These can be Optional/Mandatory. For Mandatory argument it is necessary to provide some value while calling this action. These input arguments can be used as variables while performing any operation in the action.
Output Arguments:
These are the parameters which can be returned when the action is called. These can be Optional/Mandatory.
To understand in an easy way we can compare actions with a Function/method in normal C# programming which can have parameters and also can return something at the end.
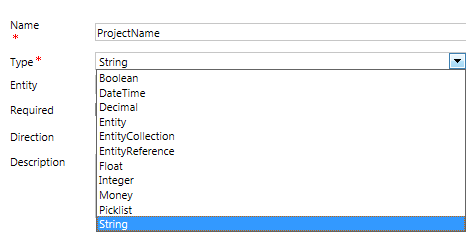
Let’s take a look of the different types of Arguments it supports.
ReturnTypes
Example:
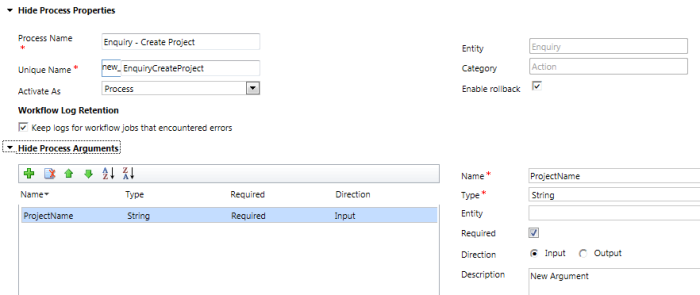
Let me create a simple Action on Enquiry entity which has one Input Argument: ProjectName [string]
To create this we need to navigate to Processes and select Category as Actions. In primary entity I am selecting Enquiry which is custom entity in my case. I have taken one Input Parameter- ProjectName. And in the step I am using this Variable during creating a Project’s record which is again a custom entity.
CreatingAction


.


And here is the snap of the Step which I have configured. Here we can see that I am using this ProjectName as a dynamic value during the Project Creation. Here note that new_EnquiryCreateProject is the name of the Action which should be referred while calling this through API.

Let’s activate this Action and see how we can call this from Plugin or JavaScript.
Calling Actions from Plugins:
CreateProjectThroughAction


Now we can call this Action from our Plugin. I have a Plugin which fires on Post Create of Enquiry. There I am calling this Action. I am passing the Input Argument ProjectName as Parameter before calling this Action. Once this is called It creates a new Project record.
// Calling the Action - new_EnquiryCreateProject
OrganizationRequest req = new OrganizationRequest("new_EnquiryCreateProject");
req["ProjectName"] = "This is a test operation for using Actions in CRM 2013 ";
req["Target"] = new EntityReference("new_enquiry", enquiryObj.Id);

//execute the request
OrganizationResponse response = service.Execute(req);
Calling Actions from Javascript
Yes we can call Actions through JavaScript. I have a stage field in the Enquiry entity and on Change of Stage field I want to call this Action. Let us see below how we can use this.
 function CallActionFromJavaScript() {
    var projectName = "Project Created through Action from Javascript";
    var entityId = Xrm.Page.data.entity.getId();
    var entityName = "new_enquiry";
    var requestName = "new_EnquiryCreateProject";
    ExecuteActionCreateProject(projectName, entityId, entityName, requestName);}
function ExecuteActionCreateProject(projectName, entityId, entityName, requestName) {
    // Creating the request XML for calling the Action
    var requestXML = ""
    requestXML += "<s:Envelope xmlns:s=\"http://schemas.xmlsoap.org/soap/envelope/\">";
    requestXML += "  <s:Body>";
    requestXML += "    <Execute xmlns=\"http://schemas.microsoft.com/xrm/2011/Contracts/Services\" xmlns:i=\"http://www.w3.org/2001/XMLSchema-instance\">";
    requestXML += "      <request xmlns:a=\"http://schemas.microsoft.com/xrm/2011/Contracts\">";
    requestXML += "        <a:Parameters xmlns:b=\"http://schemas.datacontract.org/2004/07/System.Collections.Generic\">";
    requestXML += "          <a:KeyValuePairOfstringanyType>";
    requestXML += "            <b:key>Target</b:key>";
    requestXML += "            <b:value i:type=\"a:EntityReference\">";
    requestXML += "              <a:Id>" + entityId + "</a:Id>";
    requestXML += "              <a:LogicalName>" + entityName + "</a:LogicalName>";
    requestXML += "              <a:Name i:nil=\"true\" />";
    requestXML += "            </b:value>";
    requestXML += "          </a:KeyValuePairOfstringanyType>";
    requestXML += "          <a:KeyValuePairOfstringanyType>";
    requestXML += "            <b:key>ProjectName</b:key>";
    requestXML += "            <b:value i:type=\"c:string\" xmlns:c=\"http://www.w3.org/2001/XMLSchema\">" + project
Name + "</b:value>";
    requestXML += "          </a:KeyValuePairOfstringanyType>";
    requestXML += "        </a:Parameters>";
    requestXML += "        <a:RequestId i:nil=\"true\" />";
    requestXML += "        <a:RequestName>" + requestName + "</a:RequestName>";
    requestXML += "      </request>";
    requestXML += "    </Execute>";
    requestXML += "  </s:Body>";
    requestXML += "</s:Envelope>";
    var req = new XMLHttpRequest();
    req.open("POSTtClientUrl(), false)
    req.setRequestHeader("Accept", "application/xml, text/xml, */*");
    req.setRequestHeader("Content-Type", "text/xml; charset=utf-8");
    req.setRequestHeader("SOAPAction", "http://schemas.microsoft.com/xrm/2011/Contracts/Services/IOrganizationServic
/Execute");
    req.send(requestXML); 
    //Get the Resonse from the CRM Execute method
    //var response = req.responseXML.xml;
}
function GetClientUrl() {
    if (typeof Xrm.Page.context == "object") {
        clientUrl = Xrm.Page.context.getClientUrl();
    }
    var ServicePath = "/XRMServices/2011/Organization.svc/web";
    return clientUrl + ServicePath;
  }
And now the most Amazing part of Actions are that we can consider this as a unique message and can register this through Plugin registration tool and can do Custom Validations if we want to do during the execution time.
Let’s say during the execution of this Action I want to validate something or abort this Operation in certain conditions then we can easily do by registering this as a message which is  a great example of Xrm support in CRM 2013 as now it is not restricted to messages like Create, update, delete etc.
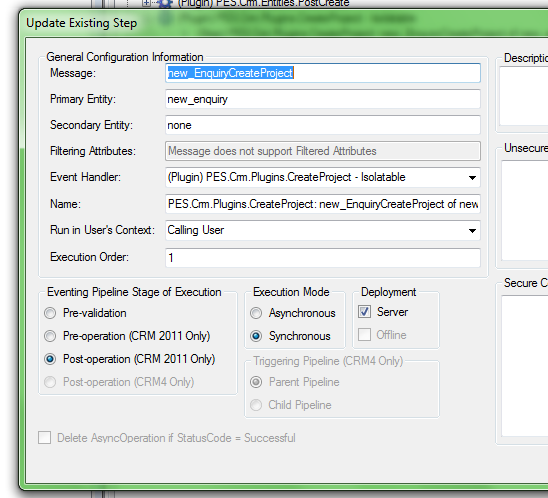
Below it is shown how we can register this through Plugin Registration Tool.
PluginMessage
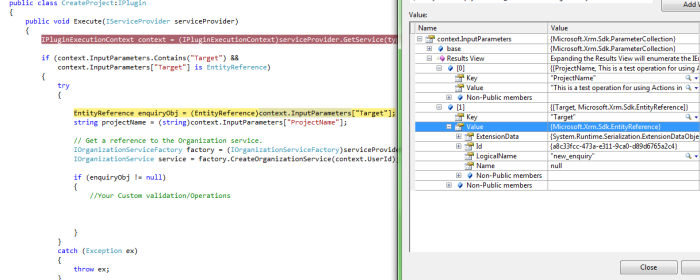
Note: These actions are little bit different from Plugins as return type of the Target is not Entity but it is Entity Reference. During the execution of this Action we can get the Input Arguments and use this for any type of validations.
Below is the sample where I am reading the values of the Target and the Input Argument ProjectName used in the above example.
PluginSampleForAction


.


Here we can clearly see that the context contains only 2 values one is the Parameter and the other one is the Target.
As a developer, introduction to Actions in this CRM 2013 release is really a great improvement from CRM’s perspective which will help us to minimize the coding part and also achieve some complex requirement easily

Thursday, September 22

MS CRM :: Secondary Entity in Plugin Registration Tool, Why NONE

MS CRM :: When is ‘Secondary Entity’ required

The following 2 messages require the ‘Secondary Entity’ to be specified while registering a step in Plugin registration:
  • SetRelated
  • RemoveRelated
These two methods were extensively used in Dynamics CRM 4.0, but they were deprecated from Dynamics CRM 2011 onwards; although you can still use them in 2011 and 2013.

What are the supported ‘Secondary Entities’

Following is the table depicting the out-of-the-box ‘Primary Entity’ and ‘Secondary Entity’ that are supported for both ‘SetRelated’ and ‘RemoveRelated’ messages:
Primary EntitySecondary EntitySupported Relationships
InvoiceContactcontactinvoices_association
LeadAccountaccountleads_association
LeadContactcontactleads_association
OpportunityAccountopportunity_customer_accounts
OpportunityContactopportunity_customer_contacts
OpportunityCompetitoropportunitycompetitors_associationor
ProductLeadleadproduct_association
ProductCompetitorcompetitorproduct_association
QuoteContactcontactquotes_association
SalesLiteratureCompetitorcompetitorsalesliterature_association
SalesLiteratureProductproductsalesliterature_association
SalesOrderContactcontactorders_association
You can also find this entire list in the Dynamics CRM SDK,

What does ‘SetRelated’ and ‘RemovedRelated’ do

These two messages are basically triggered when a primary entity record is associated/dissociated with/from the secondary entity record via the relationships supported, details of which are mentioned above. So, if you’re planning to execute some business logic on association of the above mentioned entities, you can register the plugin against the ‘SetRelated’ message. The ‘RemoveRelated’ works for dissociation of the entity records from each other.

From Dynamics CRM 2011 onwards, the ‘SetRelated’ and ‘RemoveRelated’ have been succeeded by the ‘Associate’ and ‘Disassociate’ messages respectively.