Bhoopathi

"Be Somebody Nobody Thought You could Be"

Wednesday, August 31

Microsoft CRM :: Impersonation


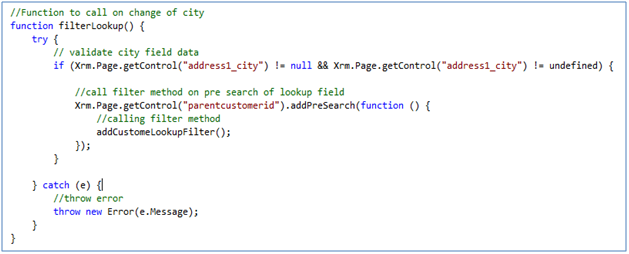
For example, one scenario may be where we are creating opportunities via a portal.  
In such a case, perhaps in addition to being owned by a sales person, we want the created by to also reflect this sales person.
This can be achieved by using impersonation.  There are the two steps needed to impersonate in Microsoft Dynamics CRM:
  • The user (impersonator) must have the ActOnBehalfOf privilege or be a member of the PrivUserGroup group in Active Directory
  • Setting the CallerId property of the organization Web service proxy. Please find below a sample code that shows how to set the  
  • caller id of the organization service proxy
Impersonate in Microsoft Dynamics Crm
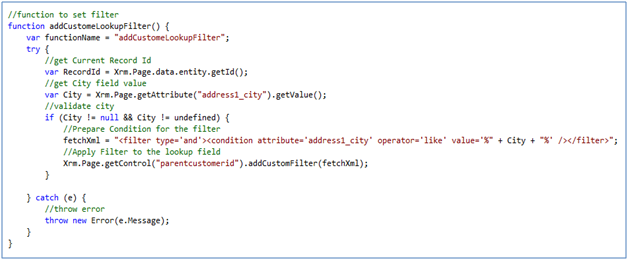
Note: the SystemUser is custom class we created for accessing system user entity fields in crm and CrmService is another custom class
we created for creating an instance of organization service proxy

Act on Behalf of Another User

In my previous two blogs I wrote about: 
• Use of a dedicated Non-Interactive Microsoft Dynamics CRM Online User to restrict access to Microsoft Dynamics CRM for use by integration between Microsoft Dynamics CRM Online and another system.

• Use of a dedicated Microsoft Dynamics CRM Security Role to restrict access to Microsoft Dynamics CRM for use by an integration between Microsoft Dynamics CRM and another system. 


In this blog, I will briefly mention the use of the Act On Behalf of Another User privilege in Microsoft Dynamics CRM 2011. 
Microsoft Dynamics CRM provides a Security Role named Delegate. This Security Role contains a single privilege named Act on Behalf of Another User. 
Act on Behalf of Another User


 Act on Behalf of Another User


In some circumstances a Microsoft Dynamics CRM User, such as that used by an integration between Microsoft Dynamics CRM and another system, such as a Web Site, or that used by a Plugin Process, needs to impersonate another user when performing certain actions such as creating, reading, writing, activating/deactivating, assigning or sharing records in Microsoft Dynamics CRM. 
There are two ways in which this ability to impersonate (or act on behalf of) another user may be provided: 
• For Microsoft Dynamics CRM Online and Microsoft Dynamics CRM On Premise deployments the DelegateSecurity Role may be assigned to the user who needs to impersonate other users. 


• Alternately, for Active Directly service deployments, the user who needs to impersonate other users may be added to the PrivUserGroup in Active Directory. 
Note: The ability to impersonate other users in Microsoft Dynamics CRM applies only to applications written to use the Microsoft Dynamics CRM Web Services. This ability does not apply to users using Microsoft Dynamics CRM using the Microsoft Dynamics CRM Web Client or the Microsoft Dynamics CRM for Outlook Client. 
With respect to security there are a couple of important points to be aware of: 
• When acting on behalf of another user, the delegate user will not have access to any additional privileges; such as create, read, write, delete, append, append to, assign or share; that they do not already have themselves. For example, if the delegate user has the privileges required to Create, Read, Write, Append and Append To Account and Contact records, but does not have the privileges required to Delete, Assign or Share Account and Contact records, then even though the user they are acting on behalf of may have all of these privileges, the delegate user will not be able to perform any of the actions for which they themselves do not have the required privileges; i.e. Delete, Assign and Share.

Privileges Assigned to the Delegate User 
 Act on Behalf of Another User


Privileges Assigned to the Impersonated User 
 Act on Behalf of Another User


Effective Privileges
In this example, when the delegate user is acting on behalf of the other user the following are the effective privileges they will have: 
 Act on Behalf of Another User


• When acting on behalf of another user, the delegate user will have access to the same level of privileges assigned to the user they are acting on behalf of.


(a)    This may result in the delegate user being granted elevated privileges. For example, if the delegate user has Business Unit access level privileges to Create, Read, Write, Append and Append To Account and Contact records and the user they are acting on behalf of has Organisation access level privileges to Create, Read, Write, Append and Append To Account and Contact records, then the delegate  user will be able to perform those actions with Organisation access level when acting on behalf of the other user.  
Privileges Assigned to the Delegate User 
 Act on Behalf of Another User


Privileges Assigned to the Impersonated User 
 Act on Behalf of Another User


Effective Privileges
In this example, when the delegate user is acting on behalf of the other user the following are the effective privileges they will have: 
 Act on Behalf of Another User


Note: In this example, even though the impersonating user has Organisation level access to Create, Read, Write, Append and Append To Account and Contact records when acting on behalf of the impersonated user, they will not have any access to Delete, Assign or Share Account or Contact records. 
(b)   Conversely, this may result in the delegate user being granted reduced privileges. For example: 
Privileges Assigned to the Delegate User 
 Act on Behalf of Another User


Privileges Assigned to the Impersonated User 
 Act on Behalf of Another User


Effective Privileges
In this example, when the delegate user is acting on behalf of the other user the following are the effective privileges they will have: 
 Act on Behalf of Another User


The following article provides a technical description and sample how to Impersonate Another User using the Software Development Kit (SDK):

MS CRM :: Programmatically Associate and Disassociate N:N relationship records

Programmatically Associate and Disassociate N:N relationship records in Microsoft Dynamics CRM 2011

Associate and Disassociate Contact record in Account entity. To perform this operation first we need to get the account contact relationship schema name. In my case it is “contact_customer_accounts”.
Below is the code to Associate N:N relationship record.
public static void AssociateContactsToAccount(EntityReference contact, EntityReference account, IOrganizationService service)
        {

            // Creating EntityReferenceCollection for the Contact
            EntityReferenceCollection relatedEntities = new EntityReferenceCollection();

            // Add the related entity contact
            relatedEntities.Add(contact);

            // Add the Account Contact relationship schema name
            Relationship relationship = new Relationship("contact_customer_accounts");
            
            // Associate the contact record to Account
            service.Associate(account.LogicalName, account.Id, relationship, relatedEntities);
            
        }
Disassociate N:N relationship records in CRM 2011
public static void DisassociateContactsToAccount(EntityReference contact, EntityReference account, IOrganizationService service)
        {

            // Creating EntityReferenceCollection for the Contact
            EntityReferenceCollection relatedEntities = new EntityReferenceCollection();

            // Add the related entity contact
            relatedEntities.Add(contact);

            // Add the Account Contact relationship schema name
            Relationship relationship = new Relationship("contact_customer_accounts");

            // Disassociate the contact record to Account
            service.Disassociate(account.LogicalName, account.Id, relationship, relatedEntities);
            
        }

Tuesday, August 30

MS CRM :: Apply Custom Filter on Lookup Field

Apply Custom Filter on Lookup Field in Dynamics CRM using Script

Introduction
In this blog we are going to see how to apply custom filter to the lookup field using the JavaScript functions.In Microsoft Dynamics CRM we can filter a lookup field on form using the Fetch XML condition and “addPreSearch()“ method.
Example
On the Contact Entity there is a lookup field named “Account Name” and a text field “Address1: City” as shown in below screenshot.custom_filter
So, Here If we want to filter Account records in lookup view by city having value equal to field Address1: City. We can do this by writing the below code in Jscript.
Here we have written two functions “filterLookup()” and “addCustomeLookupFilter()”  as shown in the below code snippets. custom_filter1
We have created CRM webresource for the javascript and called “filterLookup” function on change event for field “Address1: City” field as below for contact entity form.custom_filter2
Function “filterLookup” will be trigger on change of field “Address1: City”. This binds “addPreSearch” event to lookup control “parentcustomerid”.custom_filter3
Open the contact entity record, Before entering the “Address1:City” field value the lookup field shows all the account records as below screenshot.custom_filter4
Enter the value for “Address1: City” here it is “US” as below.custom_filter5
Then Check for the suggested options for the Account lookup. Only those accounts records will be available to select which having city “US”.

Wednesday, August 24

MS CRM :: The security model of Microsoft Dynamics CRM

The security model of Microsoft Dynamics CRM:

Role-based security: 
                                                In Microsoft Dynamics CRM focuses on grouping a set of privileges together that describe the responsibilities (or tasks that can be performed) for a user. Microsoft Dynamics CRM includes a set of predefined security roles. Each aggregates a set of user rights to make user security management easier. Also, each application deployment can define its own roles to meet the needs of different users.

Record-based security: 
                                                In Microsoft Dynamics CRM focuses on access rights to specific records.

Field-level security:        
                                                In Microsoft Dynamics CRM restricts access to specific high business impact fields in an entity only to specified users or teams.

Access levels:

  • Global. This access level gives a user access to all records within the organization, regardless of the business unit hierarchical level to which the instance or the user belongs. The application refers to this access level as Organization.This level of access is usually reserved for managers with authority over the organization.

  • Deep. This access level gives a user access to records in the user's business unit and all business units subordinate to the user's business unit.The application refers to this access level as Parent: Child Business Units.This level of access is usually reserved for managers with authority over the business units.

  • Local. This access level gives a user access to records in the user's business unit.The application refers to this access level as Business Unit.This level of access is usually reserved for managers with authority over the business unit.

  • Basic This access level gives a user access to records he or she owns, objects that are shared with the user, and objects that are shared with a team of which the user is a member.The application refers to this access level as User.
  • None. No access is allowed.

Putting it all together

  • If a user has the Deep Read Account privilege, this user can read all accounts in his or her business unit, and all accounts in any child business unit of that business unit.
  • If a user has Local Read Account privileges, this user can read all accounts in the local business unit.
  • If a user is assigned the Basic Read Account privilege, this user can read only the accounts that he or she owns or the accounts that are shared with him or her.
  • A customer service representative with the Basic Read Account privilege can view accounts that he or she owns and any accounts another user has shared with this user. This makes it possible for the representative to read the account data that is relevant to a service request, but not to change the data.
  • A data analyst with the Local Read Account privilege can view account data and run account-related reports for all accounts in his or her business unit.
  • A finance officer for the company with the Deep Read Account privilege can view account data and run account-related reports for all accounts in his or her business unit and accounts in any child business unit.

Plug-in Images (Pre vs. Post)

Images are snapshots of the entity’s attributes, before and after the core system operation. Following table shows when in the event pipeline different images are available:
Message
Stage
Pre-Image
Post-Image
Create
PRE
No
No
Create
POST
No
Yes
Update
PRE
Yes
No
Update
POST
Yes
Yes
Delete
PRE
Yes
No
Delete
POST
Yes
No

The benefits of images

  • One of the best uses for this is in update plug-ins. As mentioned before, update plug-in target entity only contains the updated attributes. However, often the plug-in will require information from other attributes as well. Instead of issuing a retrieve, the best practice is to push the required data in an image instead.
  • Comparison of data before and after. This allows for various audit-type plugins, that logs what the value was before and after, or calculating the time spent in a stage or status.
Pre vs. Post images:

  • Plugins in Dynamics CRM, allow you to register images against the steps of a plugin assembly. Images are a way to pass the image of the record that is currently being worked upon prior or after the action has been performed. In general it could be said, it is the image of the record as is available in the SQL backend.
  • Two types of Images are supported, Pre-Image and Post Image.
  • In case of Pre-image, you get the image of the record as is stored in the SQL database before the CRM Platform action has been performed.
  • Post Image, returns the image of the record after the CRM Platform action has been performed.

MS CRM :: Security Roles

Security Roles

Security roles in Microsoft Dynamics CRM are a matrix of privileges and access levels for the various entities. They are grouped under different tabs based on their functionality. These groups include: Core Records, Marketing, Sales, Service, Business Management, Service Management, Customization and Custom Entities.


Privileges:Privileges are the basic security units that delineate what action a user can perform on the CRM system. These cannot be added or deleted but only modified. The common privileges in Microsoft Dynamics CRM for each entity are as follows:
  • Create — Allows the user to add a new record
  • Read — Allows the user to view a record
  • Write — Allows the user to edit a record
  • Delete — Allows the user to delete a record
  • Append — Allows the user to attach other entities to, or associate other entities with a   parent record
  • Append to — Allows the user to attach other entities to, or associate other entities with the record
The bottom level lists miscellaneous privileges such as viewing audit history/summary, bulk delete, publish e-mail templates/reports/articles and so on.
Levels of AccessThis is indicated by the degree of fill and color of the little circles against each entity for each privilege. These levels determine the records of an entity upon which the user can perform a given privilege. The 5 levels of access are as follows:
  • None — No privileges given
  • User — Privileges to the records owned by the user or shared with the user. Also includes the privileges owned by the team to which the user belongs.
  • Business Unit — Privileges for all records owned in the business unit to which the user belongs
  • Parent: Child Business Unit — Privileges for all records owned in the business unit to which the user belongs and to all the child business units subordinate to that business unit
  • Organization — Privileges for all records in the organization regardless of who owns it.

Tuesday, August 23

MS CRM :: FetchXML usage

FetchXML - Complete Reference


FetchXML Summary
FetchXML is a query language used in Microsoft Dynamics CRM and has following features:
  • FetchXML can be used for retrieving data from Microsoft Dynamics CRM.
  • FetchXML cannot be used for Create, Update and Delete operations.
  • FetchXML can perform aggregations like Sum, Average, Minimum, Maximum, Count(*), Count(attributename)
  • FetchXML query can do GoupBy, Sorting and Filter on linked entity.
  • FetchXML queries are defined in XML format.
  • FetchXML query can retrieve upto 5000 records in a single request.
  • FetchXML allows paging results using paging cookie.
  • FetchXML can be saved as user-owned view in the userquery entity and as an organization-owned view in the savedquery entity.

Retrieve All Attributes - FetchXML Query

In the following example, the FetchXML statement retrieves all attributes for account records:
  1. <fetch mapping='logical'>
  2. <entity name='account'>
  3. <all-attributes/>
  4. </entity>
  5. </fetch>
Explanation
  • <all-attributes /> clause makes FetchXML query to retrive all attributes for an entity.
As a best-practice retrieve only the required attributes for better performance. Retrieving selected attributes is explained below.

Retrieve All Records - FetchXML Query

In the following example, the FetchXML statement retrieves all accounts, with selected attributes:
  1. <fetch mapping='logical'>
  2. <entity name='account'>
  3. <attribute name='accountid'/>
  4. <attribute name='name'/>
  5. </entity>
  6. </fetch>
Explanation
  • FetchXML query will return all the records if no filter applied.
  • To retrieve the selected attributes for an entity specify each attribute separately.
    <attribute name='accountid'/>
    
    <attribute name='name'/>
    

Filter Records Based On Related Entity

In the following example, the FetchXML statement retrieves all accounts where the last name of the owning user is not equal to Cannon:
  1. <fetch mapping='logical'>
  2. <entity name='account'>
  3. <attribute name='accountid'/>
  4. <attribute name='name'/>
  5. <link-entity name='systemuser' to='owninguser'>
  6. <filter type='and'>
  7. <condition attribute='lastname' operator='ne' value='Cannon' />
  8. </filter>
  9. </link-entity>
  10. </entity>
  11. </fetch>
Explanation
  • To filter entity records add <link-entity> clause, ex <link-entity name='systemuser' to='owninguser'> . Where name attributes contains linked entity logical name and to attribute contains logical name of attribute in main entity which is linked to related entity
  • Specify filter clause within link-entity.
  • Within filter specify the filter criteria using <condition attribute='lastname' operator='ne' value='Cannon' /> . Where attribute contains logical name of attribute in related entity, operator defines the comparison type here ne means not-equal and value defines the value to compare.
Complete list of FetchXML operators is defined below.

Complete List Of FetchXML Operators

FetchXML OperatorDescritption
ltLess Than
gtGreater Than
leLess Than or Equal To
geGreater Than or Equal To
eqEquals
neNot Equals
neqNot Equal To
nullDoes Not Contain Data
not-nullContains Data
inIs In
not-inIs Not In
betweenBetween
not-betweenIs Not Between
likeLike
not-likeNot Like
yesterdayYesterday
todayToday
tomorrowTomorrow
next-seven-daysNext Seven Days
last-seven-daysLast Seven Days
next-weekNext Week
last-weekLast Week
this-monthThis Month
last-monthLast Month
next-monthNext Month
onOn
on-or-beforeOn or Before
on-or-afterOn on After
this-yearThis Year
last-yearLast Year
next-yearNext Year
eq-useridEquals Current User
ne-useridDoes Not Equal Current User
eq-businessidEquals Current Business Unit
ne-businessidDoes Not Equal Current Business Unit
this-weekThis Week
last-x-monthsLast X Months
eq-userlanguageEquals User Language
eq-userteamsEquals Current User’s Teams
in-fiscal-yearIn Fiscal Year
in-fiscal-periodIn Fiscal Period
in-fiscal-period-and-yearIn Fiscal Period and Year
in-or-after-fiscal-period-and-yearIn or After Fiscal Period and Year
in-or-before-fiscal-period-and-yearIn or Before Fiscal Period and Year
last-fiscal-yearLast Fiscal Year
this-fiscal-yearThis Fiscal Year
next-fiscal-yearNext Fiscal Year
last-x-fiscal-yearsLast X Fiscal Years
next-x-fiscal-yearsNext X Fiscal Years
last-fiscal-periodLast Fiscal Period
this-fiscal-periodThis Fiscal Period
next-fiscal-periodNext Fiscal Period
last-x-fiscal-periodsLast X Fiscal Periods
next-x-fiscal-periodsNext X Fiscal Periods

Limit Maximum Number Of Records Returned.

In the below example, the FetchXML returns top 3 records of account.
  1. <fetch mapping='logical' count='3'>
  2. <entity name='account'>
  3. <attribute name='name' alias='name'/>
  4. </entity>
  5. </fetch>
Explanation
  • To limit maximum number of records returned specify count attribute in fetch node.
  • Maximum 5000 records can be returned from FetchXML query.

Inner Join In FetchXML.

In the below example, the FetchXML performs inner join on account and contact entity and returns contacts where accountid of account matches parentcustomerid of contact.
  1. <fetch version='1.0' mapping='logical' distinct='false'>
  2. <entity name='contact'>
  3. <attribute name='fullname'/>
  4. <link-entity name='account' to='parentcustomerid' from='accountid' link-type='inner'>
  5. <attribute name='name'/>
  6. </link-entity>
  7. </entity>
  8. </fetch>
Explanation
  • To perform inner join in FetchXML query set following attributes in link-entity clause.
    • Set name attribute to logical name of related entity.
    • Set to attribute to linking attribute in primary entity.
    • Set from attribute to linking attribute in related entity.
    • Set link-type attribute to inner.
  • Now within link-entity clause specify attributes from related entity to retrieve

Left Outer Join In FetchXML

A left outer join returns each row that satisfies the join of the first input with the second input. It also returns any rows from the first input that had no matching rows in the second input. The nonmatching rows in the second input are returned as null values.
In the below example, the FetchXML finds all accounts that have no leads
  1. <fetch mapping='logical'>
  2. <entity name='account'>
  3. <attribute name='name' />
  4. <link-entity name='lead' from='leadid' to='originatingleadid' link-type='outer' />
  5. <filter type='and'>
  6. <condition entityname='lead' attribute='leadid' operator='null' />
  7. </filter>
  8. </entity>
  9. </fetch>
Explanation
You can perform a left outer join in FetchXML by using the entityname attribute as a condition operator. The entityname attribute is valid in conditions, filters, and nested filters.
  • To perform left outer join in FetchXML query set following attributes in link-entity clause.
    • Set name attribute to logical name of related entity.
    • Set to attribute to linking attribute in primary entity.
    • Set from attribute to linking attribute in related entity.
    • Set link-type attribute to outer.
  • In filter clause specify the condition with following attrbutes
    • Set entityname attribute to logical name of related entity.
    • Set attribute to linking attribute in related entity
    • Set operator to valid FetchXML operator(null in this case).

Aggregates in FetchXML

In Microsoft Dynamics CRM FetchXML includes grouping and aggregation features that let you calculate sum, average, minimum, maximum and count.


The following aggregate functions are supported:
  • sum
  • avg
  • min
  • max
  • count(*)
  • count(attribute name)

About Aggregation

To create an aggregate attribute,
  • Set the keyword aggregate to true in fetch node.
  • Specify a valid entity name, attribute name, and alias (variable name).
  • You must also specify the type of aggregation you want to perform, for example count, min, max etc.
The following example shows a simple aggregate attribute in FetchXML.
  1. <fetch distinct='false' mapping='logical' aggregate='true'>
  2. <entity name='entity name'>
  3. <attribute name='attribute name' aggregate='count' alias='alias name'/>
  4. </entity>
  5. </fetch>

Average Aggregates

Following FetchXML calculates average of estimated value from opportunity.
  1. <fetch distinct='false' mapping='logical' aggregate='true'>
  2. <entity name='opportunity'>
  3. <attribute name='estimatedvalue' alias='estimatedvalue_avg' aggregate='avg' />
  4. </entity>
  5. </fetch>
Explanation
To calculate average set following:
  • Set aggregate to true in <fetch> clause.
    <fetch distinct='false' mapping='logical' aggregate='true'> 
  • In <aggregate> attribute set aggregate to avg
    <attribute name='estimatedvalue' alias='estimatedvalue_avg' aggregate='avg' /> 
Limitation with null values while computing average
Null values are not considered when Microsoft Dynamics CRM computes the average of data. However, zero (0) is used.
In the following example, with the following data, the average for Account 1 (two entries) is shown as 250 whereas the average for Account 2 (two entries) is shown as 125.
TopicPotential CustomerEstimated value
Opportunity 1Account 1null
Opportunity 2Account 1250
Opportunity 3Account 20
Opportunity 4Account 2250

Count Aggregate

The following FetchXML counts opportunity records
  1. <fetch distinct='false' mapping='logical' aggregate='true'>
  2. <entity name='opportunity'>
  3. <attribute name='name' alias='opportunity_count' aggregate='count'/>
  4. </entity>
  5. </fetch>
Explanation
To calculate count set following:
  • Set aggregate to true in <fetch> clause.
    <fetch distinct='false' mapping='logical' aggregate='true'> 
  • In <aggregate> attribute set aggregate to count
    <attribute name='name' alias='opportunity_count' aggregate='count'/>  

Countcolumn Aggregate

Countcolumn aggregate counts records where specified column don’t have null.
In the following FetchXML opportunity count is returned where name column don’t have null values.
  1. <fetch distinct='false' mapping='logical' aggregate='true'>
  2. <entity name='opportunity'>
  3. <attribute name='name' alias='opportunity_colcount' aggregate='countcolumn'/>
  4. </entity>
  5. </fetch>
Explanation
To use countcolumn aggregate
  • Set aggregate to true in <fetch> clause.
    <fetch distinct='false' mapping='logical' aggregate='true'> 
  • Set aggregate to countcolumn in aggregate attribute.
    <attribute name='name' alias='opportunity_colcount' aggregate='countcolumn'/> 

Count Distinct Columns

The following FetchXML counts all opportunities with distinct names
  1. <fetch distinct='false' mapping='logical' aggregate='true'>
  2. <entity name='opportunity'>
  3. <attribute name='name' alias='opportunity_distcount' aggregate='countcolumn' distinct='true'/>
  4. </entity>
  5. </fetch>
Explanation
To count distinct column values
  • Set aggregate to true in fetch clause.
  • Set aggregate to countcoumn in aggregate attribute
  • Set distinct to true

Max Aggregate

Max aggregate returns the maximum value in a specified column.
Null values are not considered when Microsoft Dynamics CRM computes the maximum of data. However, zero (0) is used.
The following FetchXML shows how to get the maximum value from estimated column of opportunity entity.
  1. <fetch distinct='false' mapping='logical' aggregate='true'>
  2. <entity name='opportunity'>
  3. <attribute name='estimatedvalue' alias='estimatedvalue_max' aggregate='max' />
  4. </entity>
  5. </fetch>
Explanation
To get maximum value from a column set:
  • Set aggregate to true in fetch node.
  • Set aggregate to max in aggregate attribute.

Min Aggregate

Min aggregate returns the minimum value in a specified column.
Null values are not considered when Microsoft Dynamics CRM computes the minimum of data. However, zero (0) is used.
The following FetchXML shows how to get the maximum value from estimated column of opportunity entity.
  1. <fetch distinct='false' mapping='logical' aggregate='true'>
  2. <entity name='opportunity'>
  3. <attribute name='estimatedvalue' alias='estimatedvalue_min' aggregate='min' />
  4. </entity>
  5. </fetch>
Explanation
To get minimum value from a column set:
  • Set aggregate to true in fetch node.
  • Set aggregate to min in aggregate attribute.

Sum Aggregate

The following FetchXML calculates the sum of estimated value from opportunity entity.
  1. <fetch distinct='false' mapping='logical' aggregate='true'>
  2. <entity name='opportunity'>
  3. <attribute name='estimatedvalue' alias='estimatedvalue_sum' aggregate='sum' />
  4. </entity>
  5. </fetch>
Explanation
To get the sum of values in a column:
  • Set aggregate to true in fetch node.
  • Set aggregate to sum in aggregate attribute.

Multiple Aggregates

Multiple aggregates can be computed in a single FetchXML query.
Following FetchXML calculates count, sum and avg from opportunity entity.
  1. <fetch distinct='false' mapping='logical' aggregate='true'>
  2. <entity name='opportunity'>
  3. <attribute name='opportunityid' alias='opportunity_count' aggregate='count'/>
  4. <attribute name='estimatedvalue' alias='estimatedvalue_sum' aggregate='sum'/>
  5. <attribute name='estimatedvalue' alias='estimatedvalue_avg' aggregate='avg'/>
  6. </entity>
  7. </fetch>
Explanation
To calculate multiple aggregate in single FetchXML query
  • Set aggregate to true in fetch node.
  • For each type of aggregate add separate aggregate attribute and set aggregate value accordingly.

Group By

Aggregates can be grouped in FetchXML, to group aggregates set groupby attribute to true.
The following example returns opportunity records grouped by their owners.
  1. <fetch distinct='false' mapping='logical' aggregate='true'>
  2. <entity name='opportunity'>
  3. <attribute name='name' alias='opportunity_count' aggregate='countcolumn' />
  4. <attribute name='ownerid' alias='ownerid' groupby='true' />
  5. </entity>
  6. </fetch>
Explanation
To group aggregates in FetchXML query
  • Set aggregate to true in fetch node.
    <fetch distinct='false' mapping='logical' aggregate='true'>
    
  • Add required aggregate attribute.
    <attribute name='name' alias='opportunity_count' aggregate='countcolumn' />
    
  • Add group by attribute and set keyword groupby to true.
    <attribute name='ownerid' alias='ownerid' groupby='true' />

Group by with linked entity

The following FetchXML returns opportunities grouped by opportunity owner’s managers.
  1. <fetch distinct='false' mapping='logical' aggregate='true'>
  2. <entity name='opportunity'>
  3. <attribute name='name' alias='opportunity_count' aggregate='countcolumn' />
  4. <link-entity name='systemuser' from='systemuserid' to='ownerid'>
  5. <attribute name='parentsystemuserid' alias='managerid' groupby='true' />
  6. </link-entity>
  7. </entity>
  8. </fetch>
Explanation
To create group by with linked entity FetchXML
  • Set aggregate to true in fetch node.
    <fetch distinct='false' mapping='logical' aggregate='true'>
    
  • Add required aggregate attribute in entity clause.
    <attribute name='name' alias='opportunity_count' aggregate='countcolumn' />
    
  • Add link-entity clause in entity clause.
    <link-entity name='systemuser' from='systemuserid' to='ownerid'>
    
  • Add group by attribute in link-entity clause and set keyword groupby to true.
    <attribute name='parentsystemuserid' alias='managerid' groupby='true' />

Group By Year

Group By for dates uses the dayweekmonthquarter or year value.
The following FetchXML query shows how to use the aggregate attribute and the groupby attribute to group the results by year.
  1. <fetch distinct='false' mapping='logical' aggregate='true'>
  2. <entity name='opportunity'>
  3. <attribute name='opportunityid' alias='opportunity_count' aggregate='count'/>
  4. <attribute name='estimatedvalue' alias='estimatedvalue_sum' aggregate='sum'/>
  5. <attribute name='estimatedvalue' alias='estimatedvalue_avg' aggregate='avg'/>
  6. <attribute name='actualclosedate' groupby='true' dategrouping='year' alias='year' />
  7. <filter type='and'>
  8. <condition attribute='statecode' operator='eq' value='Won' />
  9. </filter>
  10. </entity>
  11. </fetch>
Explanation
To create group by Year FetchXML query:
  • Set aggregate to true in fetch node.
    <fetch distinct='false' mapping='logical' aggregate='true'>
    
  • Add required aggregate attribute in entity clause.
    <attribute name='name' alias='opportunity_count' aggregate='countcolumn' />
    
  • Add group by attribute set keyword groupby to true and dategrouping to year.
    <attribute name='actualclosedate' groupby='true' dategrouping='year' alias='year' />

Group By Quarter

The following example shows how to use the aggregate attribute and the groupby attribute to group the results by quarter.
  1. <fetch distinct='false' mapping='logical' aggregate='true'>
  2. <entity name='opportunity'>
  3. <attribute name='opportunityid' alias='opportunity_count' aggregate='count'/>
  4. <attribute name='estimatedvalue' alias='estimatedvalue_sum' aggregate='sum'/>
  5. <attribute name='estimatedvalue' alias='estimatedvalue_avg' aggregate='avg'/>
  6. <attribute name='actualclosedate' groupby='true' dategrouping='quarter' alias='quarter' />
  7. <filter type='and'>
  8. <condition attribute='statecode' operator='eq' value='Won' />
  9. </filter>
  10. </entity>
  11. </fetch>
Explanation
To create group by Quarter FetchXML query:
  • Set aggregate to true in fetch node.
    <fetch distinct='false' mapping='logical' aggregate='true'>
    
  • Add required aggregate attribute in entity clause.
    <attribute name='name' alias='opportunity_count' aggregate='countcolumn' />
    
  • Add group by attribute set keyword groupby to true and dategrouping to quarter.
    <attribute name='actualclosedate' groupby='true' dategrouping='quarter' alias='quarter' />

Group By Month

The following FetchXML shows how to use the aggregate attribute and the groupby attribute to group the results by month.
  1. <fetch distinct='false' mapping='logical' aggregate='true'>
  2. <entity name='opportunity'>
  3. <attribute name='opportunityid' alias='opportunity_count' aggregate='count'/>
  4. <attribute name='estimatedvalue' alias='estimatedvalue_sum' aggregate='sum'/>
  5. <attribute name='estimatedvalue' alias='estimatedvalue_avg' aggregate='avg'/>
  6. <attribute name='actualclosedate' groupby='true' dategrouping='month' alias='month' />
  7. <filter type='and'>
  8. <condition attribute='statecode' operator='eq' value='Won' />
  9. </filter>
  10. </entity>
  11. </fetch>
Explanation
To create group by Month FetchXML query:
  • Set aggregate to true in fetch node.
    <fetch distinct='false' mapping='logical' aggregate='true'>
    
  • Add required aggregate attribute in entity clause.
    <attribute name='name' alias='opportunity_count' aggregate='countcolumn' />
    
  • Add group by attribute set keyword groupby to true and dategrouping to month.
    <attribute name='actualclosedate' groupby='true' dategrouping='month' alias='month' />

Group By Week

The following FetchXML shows how to use the aggregate attribute and the groupby attribute to group the results by week.
  1. <fetch distinct='false' mapping='logical' aggregate='true'>
  2. <entity name='opportunity'>
  3. <attribute name='opportunityid' alias='opportunity_count' aggregate='count'/>
  4. <attribute name='estimatedvalue' alias='estimatedvalue_sum' aggregate='sum'/>
  5. <attribute name='estimatedvalue' alias='estimatedvalue_avg' aggregate='avg'/>
  6. <attribute name='actualclosedate' groupby='true' dategrouping='week' alias='week' />
  7. <filter type='and'>
  8. <condition attribute='statecode' operator='eq' value='Won' />
  9. </filter>
  10. </entity>
  11. </fetch>
Explanation
To create group by Week FetchXML query:
  • Set aggregate to true in fetch node.
    <fetch distinct='false' mapping='logical' aggregate='true'>
    
  • Add required aggregate attribute in entity clause.
    <attribute name='name' alias='opportunity_count' aggregate='countcolumn' />
    
  • Add group by attribute set keyword groupby to true and dategrouping to week.
    <attribute name='actualclosedate' groupby='true' dategrouping='week' alias='week' />

Group By Day

The following FetchXML shows how to use the aggregate attribute and the groupby attribute to group the results by week.
  1. <fetch distinct='false' mapping='logical' aggregate='true'>
  2. <entity name='opportunity'>
  3. <attribute name='opportunityid' alias='opportunity_count' aggregate='count'/>
  4. <attribute name='estimatedvalue' alias='estimatedvalue_sum' aggregate='sum'/>
  5. <attribute name='estimatedvalue' alias='estimatedvalue_avg' aggregate='avg'/>
  6. <attribute name='actualclosedate' groupby='true' dategrouping='day' alias='day' />
  7. <filter type='and'>
  8. <condition attribute='statecode' operator='eq' value='Won' />
  9. </filter>
  10. </entity>
  11. </fetch>
Explanation
To create group by Day FetchXML query:
  • Set aggregate to true in fetch node.
    <fetch distinct='false' mapping='logical' aggregate='true'>
    
  • Add required aggregate attribute in entity clause.
    <attribute name='name' alias='opportunity_count' aggregate='countcolumn' />
    
  • Add group by attribute set keyword groupby to true and dategrouping to day.
    <attribute name='actualclosedate' groupby='true' dategrouping='day' alias='day' />

Multiple group by

The following FetchXML shows how to use the aggregate attribute and multiple groupby clauses.
  1. <fetch distinct='false' mapping='logical' aggregate='true'>
  2. <entity name='opportunity'>
  3. <attribute name='opportunityid' alias='opportunity_count' aggregate='count'/>
  4. <attribute name='estimatedvalue' alias='estimatedvalue_sum' aggregate='sum'/>
  5. <attribute name='estimatedvalue' alias='estimatedvalue_avg' aggregate='avg'/>
  6. <attribute name='actualclosedate' groupby='true' dategrouping='quarter' alias='quarter' />
  7. <attribute name='actualclosedate' groupby='true' dategrouping='year' alias='year' />
  8. <filter type='and'>
  9. <condition attribute='statecode' operator='eq' value='Won' />
  10. </filter>
  11. </entity>
  12. </fetch>
Explanation
To create multiple group by FetchXML query:
  • Set aggregate to true in fetch node.
    <fetch distinct='false' mapping='logical' aggregate='true'>
    
  • Add required aggregate attributes in entity clause.
    <attribute name='name' alias='opportunity_count' aggregate='count' />
    
  • Add multiple group by attributes by setting keyword groupby to true.
    <attribute name='actualclosedate' groupby='true' dategrouping='quarter' alias='quarter' />
    <attribute name='actualclosedate' groupby='true' dategrouping='year' alias='year' />

Order by

The following FetchXML query shows how to use the aggregate attribute and multiple orderby clauses.
  1. <fetch distinct='false' mapping='logical' aggregate='true'>
  2. <entity name='opportunity'>
  3. <attribute name='opportunityid' alias='opportunity_count' aggregate='count'/>
  4. <attribute name='estimatedvalue' alias='estimatedvalue_sum' aggregate='sum'/>
  5. <attribute name='estimatedvalue' alias='estimatedvalue_avg' aggregate='avg'/>
  6. <attribute name='actualclosedate' groupby='true' dategrouping='quarter' alias='quarter' />
  7. <attribute name='actualclosedate' groupby='true' dategrouping='year' alias='year' />
  8. <order alias='year' descending='false' />
  9. <order alias='quarter' descending='false' />
  10. <filter type='and'>
  11. <condition attribute='statecode' operator='eq' value='Won' />
  12. </filter>
  13. </entity>
  14. </fetch>
Explanation
To create order by FetchXML query:
  • Add order clause in entity and set descending keyword to true or false.
    <order alias='year' descending='false' />
    

Fiscal Date in FetchXML

FetchXML query can query data on fiscal dates. For example, a FetchXML query can find all orders fulfilled in the last fiscal month or urgent cases with high severity that are older than 15 minutes.
For all fiscal date queries, the FetchXML query uses the organization’s fiscal year settings.

Last Fiscal Period FetchXML Query

The following example shows a FetchXML expression that finds all orders fulfilled in the last fiscal period, according to the organization’s fiscal year settings.
For example, if the organization uses fiscal months, the query returns orders fulfilled in the last fiscal month. If the organization uses fiscal quarters, the query returns orders fulfilled in the last fiscal quarter. If the organization uses fiscal semesters, orders fulfilled in the last fiscal semester are returned.
  1. <fetch>
  2. <entity name="order">
  3. <attribute name="name"/>
  4. <filter type="and">
  5. <condition attribute="datefulfilled" operator="last-fiscal-period"/>
  6. </filter>
  7. </entity>
  8. </fetch>
Explanation
To create last fiscal period FetchXML query:
  • In condition attribute set operator keyword to last-fiscal-period.
    <condition attribute="datefulfilled" operator="last-fiscal-period"/>
    

In Fiscal Year FetchXML Query

The following example shows a FetchXML expression that finds all accounts created in fiscal year 2013.
  1. <fetch>
  2. <entity name="account">
  3. <attribute name="name"/>
  4. <filter type="and">
  5. <condition attribute="createdon" operator="in-fiscal-year" value="2013"/>
  6. </filter>
  7. </entity>
  8. </fetch>
Explanation
To create In Fiscal Year FetchXML query:
  • In condition attribute set operator keyword to in-fiscal-year.
    <condition attribute="createdon" operator="in-fiscal-year" value="2013"/>
    

next-x-fiscal-years Query

The following example shows a FetchXML expression that finds all opportunities with an estimated close date in the next three fiscal years, based on the organization’s fiscal year settings.
  1. <fetch>
  2. <entity name="opportunity">
  3. <attribute name="name"/>
  4. <filter type="and">
  5. <condition attribute="estimatedclosedate" operator="next-x-fiscal-years" value="3"/>
  6. </filter>
  7. </entity>
  8. </fetch>
Explanation
To create next-x-fiscal-years FetchXML query:
  • In condition attribute set operator keyword to next-x-fiscal-years.
    <condition attribute="createdon" operator="in-fiscal-year" value="2013"/>
    
  • Specify value of x in value attribute of condition tag.

in-fiscal-period FetchXML Query

The following example shows a FetchXML expression that finds all orders fulfilled in period three of any fiscal year, according to the organization’s fiscal year settings. The fiscal period value is specified in the value attribute of the condition tag. If the organization uses fiscal months, the query returns results from month three. If the organization uses fiscal quarters, the query returns results from quarter three. If the organization uses fiscal semesters, no results are returned; there are only two semesters, and the value supplied is therefore out-of-range.
  1. <fetch>
  2. <entity name="order">
  3. <attribute name="name"/>
  4. <filter type="and">
  5. <condition attribute="datefulfilled" operator="in-fiscal-period" value="3"/>
  6. </filter>
  7. </entity>
  8. </fetch>
Explanation
To create in-fiscal-period FetchXML query:
  • In condition attribute set operator keyword to in-fiscal-period.
    <condition attribute="datefulfilled" operator="in-fiscal-period" value="3"/>
    
  • Specify value of fiscal period in value attribute of condition tag.

in-fiscal-period-and-year Query

The following example shows a FetchXML expression that finds all orders fulfilled in period three of fiscal year 2013, according to the organization’s fiscal year settings. If the organization uses fiscal months, the query returns results from month three. If the organization uses fiscal quarters, the query returns results from quarter three. If the organization uses fiscal semesters, no results are returned; there are only two semesters, and the value supplied is therefore out-of-range.
  1. <fetch>
  2. <entity name="order">
  3. <attribute name="name"/>
  4. <filter type="and">
  5. <condition attribute="datefulfilled" operator="in-fiscal-period-and-year">
  6. <value>3</value>
  7. <value>2013</value>
  8. </condition>
  9. </filter>
  10. </entity>
  11. </fetch>
Explanation
To create in-fiscal-period-and-year FetchXML query:
  • In condition attribute set operator keyword to in-fiscal-period-and-year.
    <condition attribute="datefulfilled" operator="in-fiscal-period-and-year">
    
  • Specify value of fiscal period in value attribute of condition tag.
    <value>3</value>
    
  • Specify value of fiscal year in another value attribute of condition tag.
    <value>2013</value>
    

fiscal-period FetchXML Query

The following example shows a FetchXML aggregation expression that sums the total amount of orders fulfilled and groups the result by fiscal semester and fiscal year.
  1. <fetch aggregate="true">
  2. <entity name="order">
  3. <attribute name="totalamount" aggregate="sum" alias="total"/>
  4. <attribute name="datefulfilled" groupby="true" dategrouping="fiscal-period"/>
  5. </entity>
  6. </fetch>
Explanation
To create group by with linked entity FetchXML:
  • Create an aggregate query
  • Add link-entity node for entity which contains group by attribute (systemuser entity in this case.)
  • In link-entity node add required attribute containing groupby keyword with value set to true.

Using "older than" clauses for date and time values in FetchXML Query

The following example shows a FetchXML that finds incidents that are older than 30 minutes.
  1. <fetch>
  2. <entity name="incident">
  3. <attribute name="title" />
  4. <attribute name="ticketnumber" />
  5. <attribute name="createdon" />
  6. <attribute name="incidentid" />
  7. <filter type="and">
  8. <condition attribute="createdon" operator="olderthan-x-minutes" value="30" />
  9. </filter>
  10. </entity>
  11. </fetch>

Use the following syntax to specify various older than clauses in a FetchXML expression.

ClauseSyntax
Older than X minutes
<condition attribute="<AttributeName>" operator="olderthan-x-minutes" value="<VALUE>" />
This clause is not supported for date and time attributes with DateOnly behavior.
Older than X hours
<condition attribute="<AttributeName>" operator="olderthan-x-hours" value="<VALUE>" />
This clause is not supported for date and time attributes with DateOnly behavior.
Older than X days
<condition attribute="<AttributeName>" operator="olderthan-x-days" value="<VALUE>" />
Older than X weeks
<condition attribute="<AttributeName>" operator="olderthan-x-weeks" value="<VALUE>" />
Older than X months
<condition attribute="<AttributeName>" operator="olderthan-x-months" value="<VALUE>" />
Older than X years
<condition attribute="<AttributeName>" operator="olderthan-x-years" value="<VALUE>" />
- See more at: http://msxrmtools.com/fetchxml/reference#sthash.1pLIxpBu.dpuf