Bhoopathi

"Be Somebody Nobody Thought You could Be"

Friday, January 27

Buttons - Display Rules Based on Security Roles for Users

The steps outlined below require no coding and can be easily implemented utilizing the Ribbon Workbench and out-of-the-box security roles. To accomplish this, we created a custom entity (po_Security) to manage the display rules, however, this is not required as the exiting entities and privileges can be used. We created the new entity to ensure that no existing entity privileges were going to be effected, but the same principles will apply regardless if you chose to create a new entity or not.
1. First, start by downloading and installing the Ribbon Workbench.
2. In CRM, create a new solution that will contain only the entities you wish to update the button display rules for.
3. Next, launch the Ribbon Workbench from the Solutions section in Settings.
Security Roles in CRM
4. In the Ribbon Workbench, select a solution to open. We’ll select the solution that we created for the purposes of our button display rule edits.
Security Roles in CRM
5. When the solution loads in the Ribbon Workbench, select the entity to start with.
Security Roles in CRM
6. In this example, we will be removing the ability for certain users to create and add existing Leads from a sub grid on the Account entity as well as the ability to delete or remove Lead records from the grid. Select the first button to create and apply a display rule to. Right click on button and select Customize Command.
Security Roles in CRM
7. Navigate to Commands in the Solution Elements tab.
Security Roles in CRM
8. Right click on the Command and click Edit Display Rules (or select the lookup on the Display Rules field as shown on the right).
Security Roles in CRM
9. Select +Add New in the display rules viewer.
Security Roles in CRM
10. Select Add Step.
Security Roles in CRM
11. Select Entity Privilege Rule and then click OK.
Security Roles in CRM
12. Create the New Display Rule:
  • Make sure to update the ID (the name of the rule) as the default name is generic and difficult to keep track of if you have multiple rules. Use a name that will help differentiate the purpose of the rule and allow you to identify it easily.
  • AppliesTo – choses selected entity. This refers to the value input into the EntityName field.
  • EntityName – enter the schema name of the entity.
  • PrivilegeDepth – choose the appropriate level of the privilege you are using to control the display functionality of the button. In this example, we are using the Global privilege level for the created permission of the custom po_security entity created previously.
  • PrivilegeType – select the privilege type (create).
Security Roles in CRM
13. Next, select OK and the Display Rule will be added to the Command. Select OK again on the Display Rules viewer to enable the rule.
14. To apply the same rule to additional buttons, select the next button you wish to add the Display Rule to. Right click and select Customize Command.
Security Roles in CRM
15. Navigate to the Command section and select the command to customize. Right click and choose Edit Display Rules.
Security Roles in CRM
16. Select the previously created rule and click Add > to button commands. Then click OK.
Security Roles in CRM
17. Repeat these steps for all required buttons. In our example, notice all of the buttons required to be hidden in order to achieve the desired functionality.
Security Roles in CRM
18. Now that the Display Rules are applied to the necessary buttons, notice that we no longer have the ability to add a new Lead from the sub grid.
Security Roles in CRM
With a basic understanding of how Display Rules work and how to utilize out-of-the-box security roles, you can provide more flexibility to how users perform specific functions in CRM.
Want to learn more about Dynamics CRM? Did you know that we have an entire library of Webinars on Demand? Watch and learn more about CRM anywhere, anytime! Make sure you sign up for our event notifications as well, so you can be notified about any new and upcoming webinars!
Happy CRM’ing!
Wednesday, January 11

Get User Security Roles in MS CRM

Get User Security Roles


private EntityCollection GetUserSecurityRole(Guid userGuid, IOrganizationService service)
        {
            var query = new QueryExpression
            {
                LinkEntities =
                                {
                                new LinkEntity
                                {
                                    LinkFromEntityName = "role",
                                    LinkFromAttributeName = "roleid",
                                    LinkToEntityName = "systemuserroles",
                                    LinkToAttributeName = "roleid",
                                    LinkCriteria = new FilterExpression
                                        {
                                            FilterOperator =LogicalOperator.And,
                                            Conditions =
                                            {
                                            new ConditionExpression
                                            {
                                            AttributeName =  "systemuserid",
                                            Operator =    ConditionOperator.Equal,
                                            Values =
                                                        {
                                                        userGuid
                                                        }
                                            }
                                        }
                                }
                                }
                                },
                ColumnSet = new ColumnSet(true),
                EntityName = "role"
            };
            var userRoles = service.RetrieveMultiple(query);

            return userRoles;
        }

Tuesday, January 10

Different ways of Plugin Debug :: Plugin Profiler to debug Plugins with Plugin Registration Tool in CRM 2011/2013

You are a Dynamics CRM 2011/2013 Developer and you need to develop some plugnis to perform some synchronous/asynchronous operations that need realy a plugin development.

You develop your plugins on Visual Studio and you build. You build succesfully your plugins assembly and all seems fine.

You use Plugin Registration Tool (PRT) to register your plugin, steps and images.

And Now you are doing your test on your records to verify if your plugins works fine or not, and like for me, nothing works from the first time :)

So you had a Busines Process Error and you want to know why ?

It means, you should debug your code.

And There is three ways to do it : 

First way : If you are using a OnPremise version of Dynamics CRM 2011/2013 and you have your own development server with Visual Studio:
* you should copy your code in your server
* open it with Visual Studio
* put your breakpoints
* attach w3p process
* And debug

When it's ok you can copy your code, build your plugin assembly and update your register assembly with the new one.
It's the easiest way but every developer don't have a personal development server.

Second way : If you are using OnPremise version of Dynamics CRM 2011/2013 and you don't have access to your own development server but you have access to a team-owned development server without Visual Studio:
* In this case you should use the remote debugger (we will see this way in an upcoming post)

Third way : If you are using Online version of Dynamics CRM or OnPremise but you don't have access to your team-owned development server using remote debugger.
So you should use Plugin Profiler.

Plugin Profiler it's a powerful PRT component that allows users to debug plugins. This component should be installed on every organization that need plugins debugging.

Let's Go, there are steps to do when you want to use Plugin Profiler:

1 - Open PRT and connect to your CRM Organization
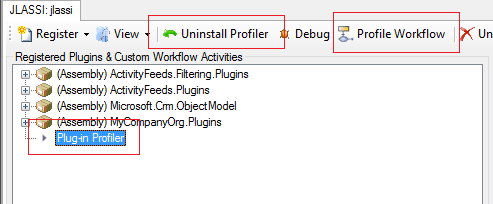
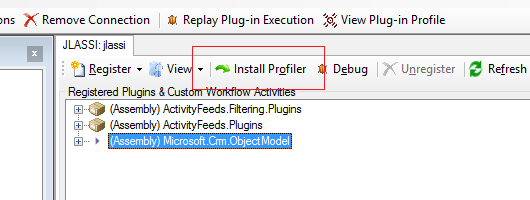
2 - Click on "Install Profiler" button


3 - Wait a few minutes until Profiler is installed successfully


4 - "Install Profiler" becomes "Uninstall Profiler", and a particular Plug-in Profiler assembly is installed.
Plugin Profiler allows also Workflows profiling.


5 - Now you can use your Profiler, it's a good thing because your creation of contact don't work fine and you want to know why?
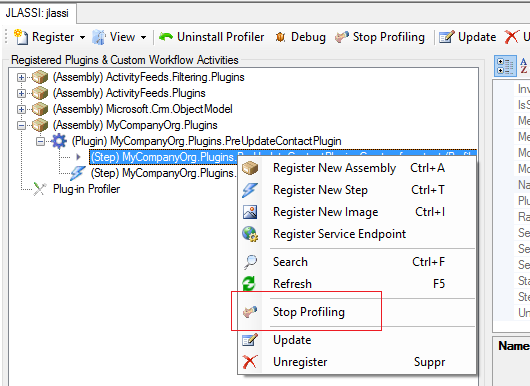
In this case, you will search the pre-operation create contact step of your plugin, click on right mouse button and click on "Start Profiling" context menu item.

The dialog window "Profile Settings" appears and you can configure storage settings (in Exception mode or in a specific custom entity(Persist mode)).   


You can also configure the limit number of execution and if you want to include "Secure Configuration" if you are using Secure Configuration in your Step like this:


 Click Ok button in the Profiler Settings dialog box.

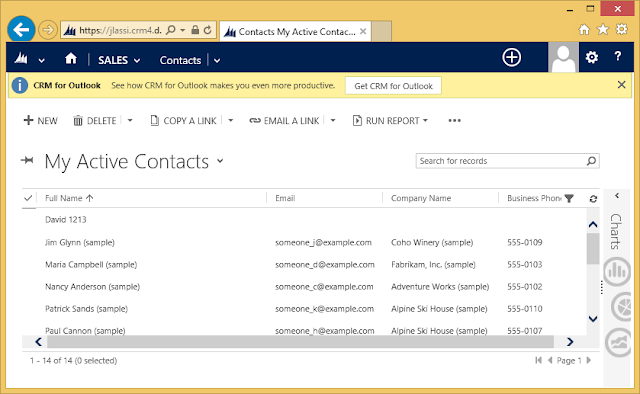
6 - return to your CRM website, go to Sales > Contacts


Click "+New" button to create a new contact :


The plugin should change the birthdate year from 5/21/2014 to 5/21/2996. When you click sur Save a Business Process Error with an incomrehensive text appears. You should download the log file and save it in the same folder of the plugin assembly. It's not necessary to save it in the same folder but it make debugging easier.


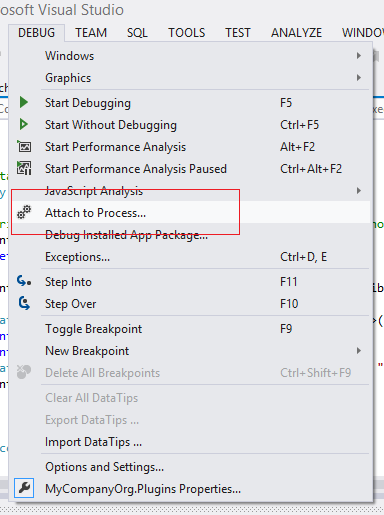
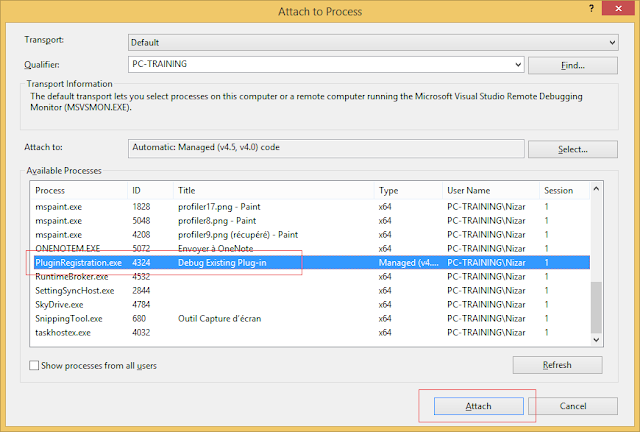
7 - Now return to your Visual Studio IDE, open your plugin solution, put your breakpoints in your source code, go to Debug menu item and click on "Attach to Process" menu item.

Select PluginRegistration.exe process and click "Attach"


8 - Now return to PRT and stop profiling


9 - It's show time, Click on Debug button.


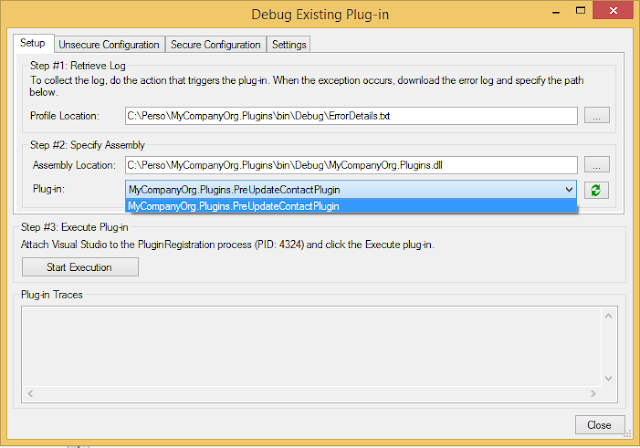
The Debug screen appears and you should select :
> Profile Location : the error details text file that you already downloaded.
> Assembly Location : the location of the plugin assembly.    


If you have custom Secure or Unsecure configuration you can  add them in the "Secure Configuration" and "Unsecure Configuration" tabs.


 You can also change the isolation mode :


Click on "Start Execution" button and return to your source code in Visual Studio to debug.

How to Debug Plugins using Profiler

One can debug CRM plug ins without connecting to CRM server or without remote debugging.
 Here are the steps as in how you can use Profiler for debugging plug ins:
1>     Connect to CRM using plugin registration tool of March SDK 2012

2>     Click on Install Profiler

 3>     You will find a new node attached to registered plugins “Plugin Profiler”.
 4 > Select a plug-in step and click Profile to enable profiling.
 
 5>     Then start your plugin from MSCRM i.e if your plugin is on update perform update operation and download the error file.
6>       Then in Visual Studio attach to process “plugin registeration.exe”. Add the breakpoint from where you would like to debug.
 7>     Then click on Debug in plugin registration tool.
8>     In Profile location provide the path of the error log of the plugin.
9>     In Assembly location provide the dll of the plugin from which you got error.
10>     Then select the Plugin class from Plug-in. This drop down will contains all classes present in the dll.
11>     To start debugging just click on Start Plug-in Execution.

Monday, January 9

How to add configuration parameters to plugins in CRM 2011

How to add configuration parameters to plugins in CRM 2011

When you design plugins, you often need an input parameter or a configuration for the plugin execution which can be easily updated without having to re-compile and/or re-register the plugin. For example, I have a plugin that sends a request to a SharePoint web service and I would like the endpoint URL for the web service to be configurable. In that case you have the following options:

1. Use a “Configuration” custom entity
This is perhaps the most popular method but it can be expensive to maintain. You can create a custom entity containing the configuration information so the plugin will read the data in the custom entity by retrieving the record each time it executes. 

PROS:
  • Easy to update the value (can be done using the CRM UI).
  • Can configure privileges to control who has access to the configuration entity.
CONS:
  • Configuration is data instead of metadata, therefore, the configuration data cannot be transported with the solution. You will need to create the configuration record in each environment.
  • You might need to control that only one configuration entity can be created.


2. Use the plugin step “Configuration”
When you register a plugin step, there is a field where you can specify some configuration parameters for the plugin execution:
image
Then in the Constructor of your plugin class you will get the configuration value which you can use later in the Execute method:
public abstract class BasePlugin : IPlugin
{
    private string _secureConfig = null;
    private string _unsecureConfig = null;

    public BasePlugin(string unsecureConfig, string secureConfig)
    {
        _secureConfig = secureConfig;
        _unsecureConfig = unsecureConfig;
    }

    public void Execute()
    {
        // Use the configuration here
    }
}

PROS:
  • The step configuration is solution-aware so it will be automatically transported with the plugin step.
CONS:
  • You need to use the plugin registration tool or another application to update the step configuration.
  • The configuration is step-specific so you have to provide it and/or update it for every step even if the value is the same for all the steps (the configuration is on each step instead of the assembly or plugin type).
  • the configuration is just an attribute of the plugin step so you cannot control privileges on the configuration independently from privileges on plugin step entity.


3. Use the plugin step “Secure Configuration”
This is similar to the step Configuration except that the configuration data is stored in a separate entity which can be secured.
PROS:
  • The configuration data can be secured as any other entity using the CRM security model. This is useful when the configuration contains sensitive information such as passwords.
CONS:
  • Secure configuration is not solution aware so you will need to configure it for each environment.
  • You need to use the plugin registration tool or another application to update the step configuration.
  • The configuration is step-specific so you have to provide it and/or update it for every step even if the value is the same for all the steps (the configuration is on each step instead of the assembly or plugin type).


4. Use a Web Resource
You can store configuration information in web resources, for example you might have some XML configuration stored in a web resource and have your plugin read the web resource each time it executes.

PROS:
  • Web resources are solution aware and the GUID is preserved across environments so you can hardcode the web resource GUID in your plugin code. You can transport the web resource and the plugin in the same solution.
  • Can be easily updated using the CRM UI.
CONS:
  • You cannot secure the configuration since it depends on the web resource access privileges and most users will need at least read access to web resources.